BY ALYSSA JULIAN
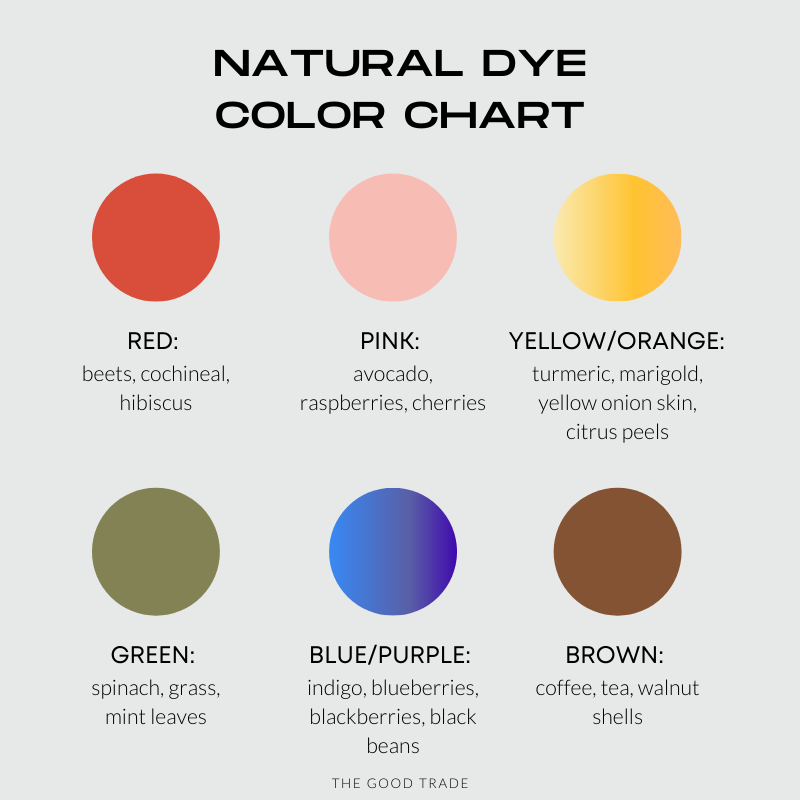
Food Scraps For Natural Colors
My first foray into natural dyes came after a trip to the Rose Bowl Flea Market, where I stumbled upon a booth full of indigo-dyed textiles (shibori) and knew I wanted to get my hands on something similar. Shortly after, I followed this Instagram account and, well, the rest is history.
Nothing makes me want to say “Sayonara, Los Angeles!” and move to a homestead in Montana more than chucking avocado stones in a pot and letting them work their magic. The colors we can draw from food (especially the unexpected ones) give our scraps a second life before composting—it all amazes me. It’s been nearly seven years since my first pass at using natural dyes, and I have no intention of stopping anytime soon.
When it comes to why natural dyes are better, the clue is really in the title—they’re natural! That means no synthetic, harmful chemicals are going on our bodies or into the wash. Natural dyes are biodegradable, nontoxic, and zero waste, too. There’s nothing needed to create them but a free day or two, an old cotton tee, some food scraps, and a big pot.
Natural dyeing can produce such varying results—and if you don’t believe me, see this post about how one natural dye bath created three very different colors. Try dyeing an old sweatshirt, a new set tea towels, or even a wall hanging; the options are endless.
Dyeing Tips for Beginners
Stick to natural, organic fabrics. Cotton, muslin, wool, silk, and linen hold dye better, the color lasts longer, and they don’t require too much work before you’re ready to dye. A simple mordant soak (see more on this below), and the plant and animal fibers in the fabric will do the rest.
Thrift your materials. You need surprisingly few products for natural dyeing: water, a large pot, and a wooden spoon. Aluminum tongs also work well to retrieve your materials from the dye bath, but I don’t think they’re 100 percent necessary. You’ll want to be sure that you don’t use any of these materials for cooking, so check your local thrift store before buying new.
Prep your fabric. In most cases, you’ll need to prep the fabric for dyeing with something called a mordant to help set the dye. It’s not a hard step, and possible mordants include vinegar, soy milk, or salt.
For veggie scraps, pre-soak your fabric in a mix of 1 cup vinegar + 4 cups water.
For fruit scraps, 1/4 cup salt + 4 cups water. (Scale as necessary.)
Some natural dye ingredients (such as avocados and onion skins) have enough tannins in them that they don’t require a mordant. If you’re unsure of the best mordant to use, consult the internet. One of our favorite natural dyers, Rebecca Desnos, swears by a soy milk mordant, which is detailed in her book here.
Follow the 2:1 rule. The general rule of thumb is a 2:1 ratio of water to dye materials, but feel free to add more peels, skins, and pits to create a more vivid dye, or water it down to make more muted colors. You’ll need enough water to cover whatever it is that you’re dyeing, so keep that in mind, too.
Your Step-By-Step Dye Guide

The best—and perhaps my favorite—part of natural dyeing is the room for experimentation. My process looks like this, but there’s a lot of flexibility in natural dyeing, so feel free to run wild!
1. For most materials, bring your mordant to a boil and add in your fabric. Keep at a rapid, low boil for one hour so the mordant can attach itself to the material. When your timer goes off, remove the fabric and rinse in cold water. Important: For wool and silk, you’ll soak, not boil. (Boiling will cause the fabrics to felt.)
2. While boiling, prep your dye by chopping up your food scraps. The ratio of water to dye material is 2:1, so plan accordingly. If you’re dyeing a lot of fabric, you’ll need more dye material and water—the solution should completely cover whatever it is that you’re dyeing.
3. Bring dye materials and water to a simmer—don’t boil the food scraps. (I’ve seen people boil and get great results, but to the best of my knowledge, it will muddle the colors of your dye.) Simmer for about an hour; you’ll usually start seeing color extractions around 30 minutes. If you want, you can simmer for an hour, turn off the heat (but leave the dye materials in the pot on the stove), and then simmer again until you see the color you want. It’s completely up to your discretion when to add the fabric so, like most natural dye instructions, I say go with your gut.
4. This is the exciting part—add your fabric! (If your fabric has dried since the mordant phase, simply rinse in cold water.) Let nature do its thing and check on your fabric periodically.
5. Finally, take your fabric out of the dye bath. I personally allow the fabric to sit in the dye bath overnight and then rinse it out the next day, but if you don’t have that kind of time, you can remove it whenever you’ve reached your desired color; this could be about four to six hours later but, again, do what feels right to you. (And remember that the fabric will be 1-2 shades lighter once rinsed and dried.) Once out of the bath, rinse the fabric with cold water. Before wearing, wash the fabric on a gentle cycle—by itself—and voila! Now you’re a natural dye expert. Spread the good word.


