7 Ways to Make Hip Thrusts Even More Effective
Hint: Think about your feet.
Reviewed by Christa Sgobba, C.P.T.
Whether you’re using dumbbells, a barbell, or just your bodyweight, the hip thrust is one of the best exercises you can do to build stronger, more powerful glutes.
That’s because the hip thrust is really, really good at isolating your gluteus maximus, the largest muscle in your butt and in your entire lower body, Sydney Rice, MS, an exercise physiologist at the Sports Performance Center at NYU Langone Health, tells SELF. This makes it different from the squat or deadlift, which require the coordination and interaction of multiple muscle groups, she says.
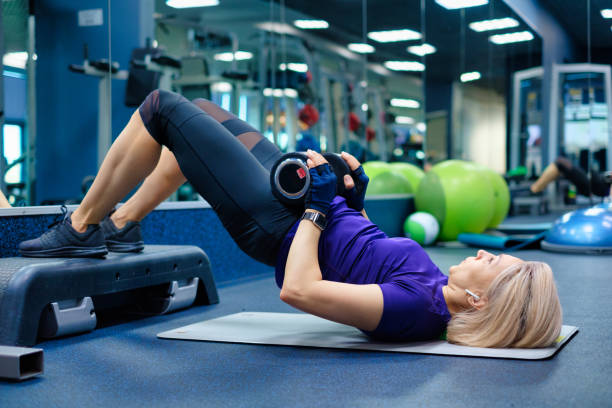
One reason the hip thrust really hammers your glutes is because of its movement pattern. Similar to a glute bridge, the hip thrust involves placing load on top of your hips and pressing your feet into the ground to lift your hips until your knees form a 90-degree angle. The combination of the hip extension, knee flexion (when your knee is bent), and the location of the load at your hips likely plays a vital role in its high glute activation. And it does all this without enlisting too much help from your hamstrings, Tessia DeMattos, DPT, CSCS, a certified sports and conditioning specialist based in New York City, tells SELF. That means your glutes really take center stage here.
What’s more, you don’t have to go super heavy with added load to really get your glutes firing in this lower-body exercise.
In fact, according to a 2020 review in the Journal of Sport Science & Medicine, the barbell hip thrust elicited high and very high gluteus maximus activation at relatively low loads. For example, a barbell hip thrust performed at 36% of your one-rep max (the amount of weight you can lift for only one rep) caused similar gluteus maximus activation as a Romanian deadlift and back squat at one rep max. So even at lower weights, the hip thrust is superb at really lighting up your glutes.
While gradually adding more and more weight to any exercise is a crucial way to keep challenging your muscles, it’s definitely not the only way to make a move work for you. And as the research above shows, you don’t have to load up the hip thrust super heavy to reap big glute gains—unless you want to, of course!
In fact, there are a whole host of other factors you can employ to make your hip thrust even more effective that have nothing to do with added weight. Here are some tips to try during your next butt workout. (Not sure exactly how to do the move? Check out our primer on how to do a hip thrust first.)
1. Warm up your glutes with activation exercises.
Isolating your butt muscles during your warm-up is a great way to get in some activation before your hip thrusts, Rice says. This is important because you want to make sure your glutes are doing the work and other muscles, like your lower back and hamstrings, aren’t kicking in instead.
For example, you can do bodyweight glute bridges to get the full range of hip motion. Other butt activation exercises include four-way kicks with a resistance band and hip circles in the quadruped (tabletop) position.
Slipping on a mini-band just above your knees or your ankles and doing some side-stepping can also get your gluteus medius (side glutes) in on the action, DeMattos says. When you’re doing the side steps, make sure to do them with a hip hinge versus a squat and maintain tension in the band throughout the exercise by stepping your leg wide enough. (Try this glute activation circuit to put all these suggestions into play!)
You can also use that same mini-band during the actual hip thrust for an added challenge.
“Having a band around your knees and pushing your knees out against the band as you’re doing the hip thrust will get a little more gluteus medius activation,” DeMattos says. “So it’s a great way to challenge yourself a little more, especially if a regular hip thrust is getting easy.”
2. Play around with your foot placement.
Your hamstrings, or the muscles in the back of your upper legs, will be working a little bit in the hip thrust, but they shouldn’t be the main drivers of the move. So if they’re the primary muscle you feel firing, you may want to make a foot placement tweak to bring the movement back into your glutes.
To get more out of your butt when doing a hip thrust, bring your feet in closer to your hips, DeMatos says.
“The farther away your feet are from your body, the more it becomes a hamstring-dominant movement,” she says.
You also want to make sure that your feet are placed flat on the floor, about shoulder-width apart, or at a distance that creates a 90-degree angle between your knee joint and tibia (shinbone) when in a hip extension, or the top of the movement, Rice says.
Some people may prefer to have their feet turned out slightly, which will allow you to hit more of your external hip rotators, like your gluteus medius, piriformis, and tensor fasciae latae, DeMattos says.
3. Think about pushing the ground away from you.
One of the most common mistakes DeMattos sees people make with the hip thrust is not intentionally thinking about pressing their entire feet into the ground to get into full hip extension. You should push evenly through your feet throughout the range of motion, Rice says. This is ultimately going to help you get more glute activation from the movement.
“You want to be a straight plank and make sure you’re pushing the ground away from you,” DeMattos says. “Everyone’s reaction is to just think, Oh, let me just try to get my hips up. So I like to tell people to push the ground away using your whole foot, not just your heels.”
As you get stronger and want to make the hip thrust more challenging, DeMattos suggests elevating your feet on a small step stool or some weight plates so that your hips have a greater range of motion to go through.
4. Find the right setup so you can reach full bridge.
When setting up for your hip thrust, you want to make sure to find the right height on a bench, couch, or box so that your upper back is comfortably positioned against it, Rice says. This will help you come to a full bridge at the top of the move, forming a straight line from your shoulders to your knees.
“Usually, if the height of the bench is the same as the height of your knees, that should be the most comfortable because when you come up, you’re able to get into a straight bridge with your shoulders elevated on the bench,” DeMattos says. (If you’re unable to adjust the height of your bench and find that you’re sitting too low on the ground, you can sit on some pads or a thick mat to elevate your body.)
Remember to keep your spine and pelvis neutral throughout the entire exercise so that your body is moving as one unit, DeMattos says.
“You can keep your hands on the weight to stabilize it and make sure it doesn’t roll off, but your head and neck shouldn’t be straining as you come up,” she explains.
DeMattos also advises keeping your bench against a wall so the bench doesn’t shift when you do the hip thrust, preventing injury.
5. Load your hip bridge safely.
Once you’re able to perform bodyweight hip thrusts with good form—and they begin to feel easy—you can start to add external resistance to load them up. Usually, this takes the form of either dumbbells or a barbell and plates. Loading safely is important, since improper technique can lead to strain.
If you’re loading with dumbbells, you can let the dumbbells stand vertically next to you and roll them over your pelvis, as long as it’s not painful or uncomfortable, Rice says. (If you find it uncomfortable, adding a pad, a towel, or a pillow on top of your hips before loading the weight can help, DeMattos says.) You can also place the dumbbells on a higher surface, such as a bench, and then lift them over your hips instead of from the floor to avoid back strain.
Once you’re able to lift at least 45 pounds (the weight of a barbell), you can shift to barbells as a loading option if you prefer. To get into position, place the bar on the floor and roll it up to your hips. For a smaller, fixed barbell, Rice and DeMattos suggest standing the bar vertically next to you on the floor, and then slowly bringing the barbell from the standing position to your hips. It’s also beneficial to have a spotter or workout partner place the barbell on your hips, she adds.
6. Slow things down.
You get the most bang for your glute activation buck by slowing down the tempo of the entire exercise. This increases the time your muscles are under tension, which is what leads to muscle growth and strength.
Add an isometric hold at the top of the movement by holding the position for at least one second. Then, with control, lower your butt back down to the ground during the eccentric phase, or the lowering phase, Rice says.
7. Use a slight posterior pelvic tilt to enhance glute activation.
It’s important to brace your core during the exercise to help protect your low back; you do this by tucking your pelvis under, which creates a posterior pelvic tilt, Rice says. You’ll know that you’re not engaging your core if you notice your lower back arching or hyperextending or your belly is flaring out. If you’re noticeably feeling the movement in your lower back, that’s also a sign that you’re not engaging your core.
“If your core isn’t engaged, then the muscles that are going to kick in for it are your back extensors,” DeMattos says. “What happens is that your back will arch, and that can create some compensation patterns [that] lead to injury.”
DeMattos likes cueing people to think about rotating their hip bones toward their nose or tilting your hips up toward you when you zip up your jeans.
At the top of the exercise, you should also squeeze your glutes while maintaining the posterior pelvic tilt to get the full activation effect, Rice says.


